
Emergency Move
Instructions
If your domain controller (DC) has failed and is not bootable you can use the following emergency procedure to quickly restore Active Directory on the original computer or recover it on a new computer.
The following are quick instructions for emergencies only. For a planned upgrade to a new computer see Planned Move.
| Important: Do not purchase a license for U-Move until after you have completed step 5 successfully. |
Step 1: Restore from a Volume Shadow Copy (if available), or...
If you have a Volume Shadow Copy (VSC) snapshot image of the C: disk available, you might be able to recover Active Directory from the volume snapshot. Boot DSRM if needed to log on, then run U-Move.
Click on the tab Restore. For the location of the AD files click on Volume Shadow Copy on a local disk, select disk C:, and go to step 5. Otherwise proceed to step 2.
Step 2: Get the most recent backup copy
 Find the most recent image of the C: disk. Use either
the original disk or a backup created with Windows Server Backup.
Connect the backup disk to the new computer if necessary.
Find the most recent image of the C: disk. Use either
the original disk or a backup created with Windows Server Backup.
Connect the backup disk to the new computer if necessary.
If you used Windows Server Backup to create compressed BD/DVD disks, use a utility such as U-Recover to expand and mount the BD/DVD disk image(s). If you used a third-party backup utility, restore a temporary copy of the C: disk image to an empty disk volume with a temporary disk letter (for example E:).
Do not use a System State backup. A System State backup is not sufficient for moving AD to a new computer.
If you have no backup of the C: disk available, you might be able to salvage Active Directory by copying the database files directly off an image of the dead computer's original C: disk. See Copying from a Dead Computer.
Step 3: Prepare the new computer
Prepare the new computer by installing a fresh copy of Windows Server. Install the same version of Windows Server as on the original computer. See the supported OS clone combinations.
Give the new computer a new temporary Internet address and a new temporary name. U-Move will scan the network to ensure that the original computer is turned off. It will copy the original computer's Internet Address and name during the move procedure.
Do not promote the new computer as a domain controller (U-Move will do it for you). Do not run DCPROMO or boot WinPE/WinRE (not necessary).
If you are prompted for Windows Product Activation, skip it for now.
If you are running Microsoft Small Business Server, see Moving Small Business Server. If you are running Microsoft Windows Server Essentials, see Moving Windows Server Essentials.
Go to Windows Update and install the most recent updates from Microsoft. A reboot will be required.
Step 4: Install U-Move
Download and install U-Move on the new computer. Do not purchase a license code yet. When prompted to enter the license code, skip it for now and click on Next.
Step 5: Do a Dry Run of U-Move
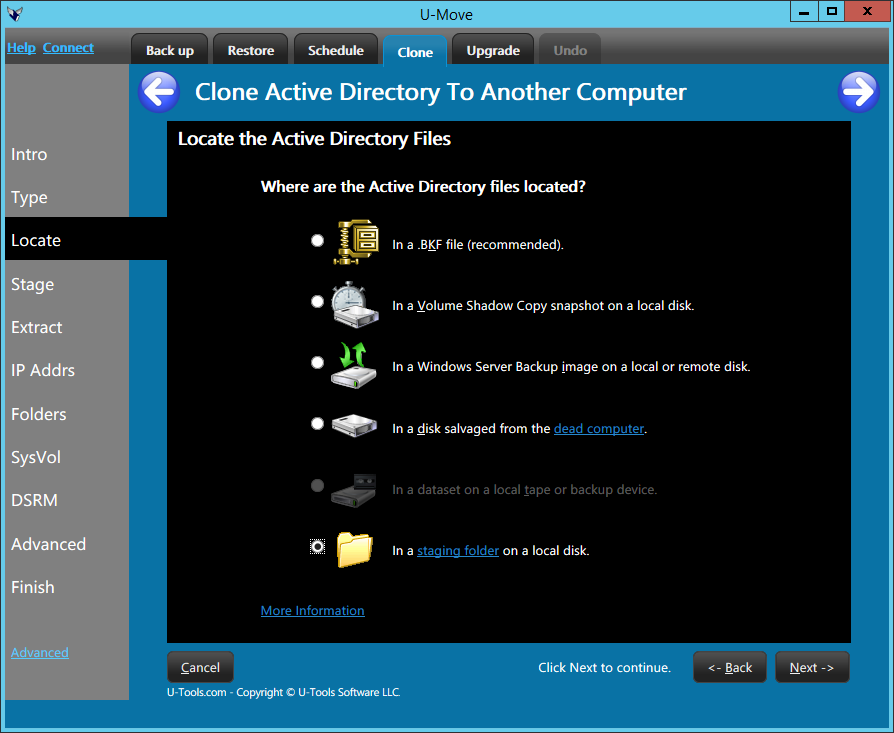
Run U-Move. Click on the tab Clone. (Click on Restore if you are restoring AD from a local volume snapshot that was created on the same computer, per step 1.)
Select This is an emergency and click Next.
When prompted type in the location of the .BKF snapshot file or the Windows Server Backup image. (If you need to apply incremental or differential backups see Incremental Restore.) If you are using a dead computer's disk, type in the path to the dead computer's disk (for example “E:\”). You can also try to recover AD from an old Volume Shadow Copy snapshot located on the dead disk.
Click Next and accept the default choices. Continue to click Next. Continue to click Next until the Finish button appears. Finally, click the Finish button.
The Finish button will advise you that you need to purchase a license code to continue. If you can see that message, then pat yourself on the back. You are in good shape! It means that U-Move believes that the recovery of Active Directory has a high probability of success. Hooray!
However, if U-Move shows an error message and refuses to proceed then you need to correct the problem or override the error message.
If U-Move still refuses to continue, then stop. The recovery attempt will not succeed. Otherwise proceed to step 6.
Step 6: Buy a License Code and Run U-Move Again
Go back to u-tools.com and purchase a license code. You will receive a license code within 60 seconds of entering your credit card information. Install the license code per these instructions. This will unlock the Finish button and allow you to proceed.
Run U-Move and click the Finish button to load Active Directory into the computer.
The computer will reboot automatically. When the logon prompt appears, the operation is complete. The new computer will have the same name, same Internet Address, and same Active Directory contents as the original computer.
Congratulations you are done!
Step 7: Clean Up
Log on to the computer and verify that Active Directory is working properly.
When you are satisfied that everything is working ok you can uninstall U-Move and delete the staging folder.
Important: Discard or erase the old computer or VM. Do not boot the old computer or VM again. This is required to prevent two identical domain controllers from serving Active Directory at the same time.
For more information
For a planned upgrade to a new computer see Planned Move.
| U-Move for Active Directory |